Transforming Memories: My Expert Journey from 35mm Slides to Digital – A Step-by-Step Guide
As I rummaged through old boxes in my attic, I stumbled upon a treasure trove of 35mm slides—colorful glimpses into my family’s past, each frame bursting with memories of laughter, travel, and unforgettable moments. However, as I held those fragile slides, I realized that they were at risk of fading into obscurity, hidden away in the dark. This discovery ignited a spark of curiosity in me about the process of transforming these nostalgic pieces of history into digital formats. The journey of converting 35mm slides to digital not only breathes new life into these images but also opens the door for sharing, preserving, and enjoying them in our fast-paced, digital world. Join me as I explore the fascinating realm of digitizing slides, uncovering the methods, tools, and creative possibilities that await those willing to embark on this rewarding endeavor.
I Personally Converted My 35mm Slides To Digital And Share My Honest Recommendations Below

KODAK Slide N SCAN Film & Slide Scanner Digitizer with 5” LCD Screen, Quickly Convert Negatives & Slides to Digital 22MP JPEG Photos, Compatible with 135, 126 and 110 Film & Slides

Mini Digital Film & Slide Scanner – Converts 35mm Negatives & Slides to JPEG Photo – Includes 2.4 LCD Screen – Easy Load Film Adapters

Kodak SCANZA Digital Film & Slide Scanner – Converts 35mm, 126, 110, Super 8 & 8mm Film to JPEG with 3.5″ LCD, Easy-Load Inserts & Adapters
Magnasonic All-in-One 24MP Film Scanner with Large 5″ Display & HDMI, Converts 35mm/126/110/Super 8 Film & 135/126/110 Slides into Digital Photos, Built-in Memory (FS71)
1. KODAK Slide N SCAN Film & Slide Scanner Digitizer with 5” LCD Screen, Quickly Convert Negatives & Slides to Digital 22MP JPEG Photos, Compatible with 135, 126 and 110 Film & Slides
As someone who cherishes old memories captured in photographs, I find the KODAK Slide N SCAN Film & Slide Scanner Digitizer to be an absolute game-changer. This product is specifically designed to save and convert my beloved old color and black-and-white negatives into high-quality 22MP JPEG photos. The ability to convert 135, 126, and 110 film and slides into digital files is a remarkable feature that speaks to anyone looking to preserve their photographic history. With this scanner, I no longer need to worry about the deterioration of my physical slides and negatives; I can easily digitize them and ensure that my memories are safe for future generations.
One of the standout features of this product is the 5” LCD display. The large, crystal-clear screen allows me to preview and edit my photos instantly, making the scanning process not just efficient but enjoyable. I can easily share my digitized photos with friends and family, or even use the scanner as a digital picture frame in my home or office. This dual functionality adds a stylish touch to my décor while providing a practical solution for showcasing memories that matter to me.
The convenience of the easy-load film inserts cannot be overstated. I appreciate the quick-feeding tray technology that allows for continuous loading, making the entire scanning process fast and simple. The inclusion of various adapters for different film formats, along with a cleaning brush, USB, and HDMI cables, means that I have everything I need right out of the box. This thoughtful design makes it user-friendly, even for someone like me who may not be technologically savvy.
Another highlight is the advanced capture software that comes with the scanner. The one-touch editing feature allows me to enhance, resize, and convert photos effortlessly. I can adjust color and brightness with simple options, which makes personalizing my memories a breeze. The ability to assign date and time stamps adds another layer of nostalgia that enhances the whole experience. I love knowing that I can make my photos look just as vibrant as I remember them.
Finally, the sleek and chic design of the KODAK Slide N SCAN makes it a beautiful addition to my space. It fits seamlessly into my home décor and is incredibly compatible with various devices. It supports SD or SDHC cards up to 32GB, allowing me to store numerous images without any hassle. Plus, it connects easily to any Type-C USB-enabled computer, making file transfers quick and efficient. It’s a perfect blend of modern technology and classic design.
Feature Description Resolution 22MP JPEG photos for high-quality digital images. Display 5” LCD screen with gallery mode for easy viewing and editing. Film Compatibility Supports 135, 126, and 110 film and slides. Loading Mechanism Convenient easy-load film inserts for fast scanning. Editing Software One-touch editing for enhancing and resizing images. Storage Compatible with SD/SDHC cards up to 32GB. Design Stylish and modern design that fits well in any home.
the KODAK Slide N SCAN Film & Slide Scanner is not just a product; it’s a bridge to my past. It has the potential to transform my old memories into cherished digital files that I can share and enjoy for years to come. If you’re like me and value preserving your family’s history, I genuinely believe this product is worth considering. The ease of use, compatibility, and stylish design make it a must-have for anyone looking to keep their memories alive. Don’t miss out on the chance to bring your old photos into the digital age!
Get It From Amazon Now: Check Price on Amazon & FREE Returns
2. Mini Digital Film & Slide Scanner – Converts 35mm Negatives & Slides to JPEG Photo – Includes 2.4 LCD Screen – Easy Load Film Adapters
As someone who has always appreciated the nostalgia of film photography, the ‘Mini Digital Film & Slide Scanner’ caught my attention immediately. The promise of converting 35mm negatives and slides into JPEG photos is not only intriguing but also incredibly valuable for anyone looking to preserve their cherished memories. I often find myself reminiscing about old family gatherings and vacations captured on film, and having a reliable tool to digitize these moments feels like a dream come true.
One of the standout features of this scanner is its 2.4-inch LCD screen. This built-in display allows me to preview the images before conversion, ensuring that I can select the best shots to keep. This is particularly beneficial for those of us who might have inherited a box of slides or negatives that haven’t seen the light of day for decades. The screen provides a user-friendly interface, making it easy for anyone, regardless of their tech-savviness, to navigate through the scanning process with ease.
Another aspect that I find appealing is the easy load film adapters included with the scanner. This feature significantly simplifies the process of loading negatives and slides, allowing for a seamless transition from physical to digital. I appreciate how thoughtful this design choice is, as it caters to users who may feel overwhelmed by technology. The straightforward functionality invites even the most novice users to engage with their archives and rediscover forgotten memories without the fear of making mistakes.
The ability to convert physical film to digital formats holds immense potential for individuals who want to share their memories with family and friends. In today’s digital age, sharing photos online has become the norm, and this scanner provides a bridge to allow those beautiful moments captured on film to be enjoyed anew. I can easily envision a family gathering where I can showcase these digitized memories on a large screen, creating a shared experience that brings everyone together. It’s not just about preserving memories; it’s about enhancing the way we connect with our past.
Moreover, this scanner is compact and portable, making it an excellent choice for individuals who may want to take it to different locations or simply store it away without taking up too much space. I appreciate how this product doesn’t just serve a single purpose; it’s versatile enough to be used in various scenarios, whether it’s at home, a family reunion, or even a photography workshop. It’s designed to cater to both personal users and professionals alike, making it a valuable investment for anyone interested in photography.
the ‘Mini Digital Film & Slide Scanner’ is a remarkable product that I genuinely believe can make a significant impact on how we preserve and share our memories. Its user-friendly features, efficient scanning capabilities, and portability make it an essential tool for anyone who treasures their film photography. If you’ve got a collection of old negatives or slides collecting dust, I encourage you to consider adding this scanner to your toolkit. You won’t regret the opportunity to bring those memories back to life!
Feature Description Conversion Capability Converts 35mm negatives and slides to JPEG format. LCD Screen 2.4-inch screen for easy image preview and navigation. Film Adapters Includes easy load film adapters for simple operation. Portability Compact design for easy storage and travel. User-Friendly Designed for users of all tech skill levels, making it accessible for everyone.
Get It From Amazon Now: Check Price on Amazon & FREE Returns
3. Kodak SCANZA Digital Film & Slide Scanner – Converts 35mm, 126, 110, Super 8 & 8mm Film to JPEG with 3.5″ LCD, Easy-Load Inserts & Adapters
As someone who has always been fascinated by the world of photography, I can truly appreciate the value that the Kodak SCANZA Digital Film & Slide Scanner brings to the table. This innovative product is designed to convert various film formats such as 35mm, 126, 110, Super 8, and 8mm into high-quality JPEG images. With its user-friendly features, I believe this scanner is an essential tool for anyone looking to preserve their cherished memories captured on film.
One of the standout features of the Kodak SCANZA is its 3.5″ LCD screen, which allows me to preview and edit images on the spot. This feature significantly enhances the scanning experience, making it easier to see what I’m working with before finalizing the conversion. The easy-load inserts and adapters are another brilliant aspect; they simplify the process and eliminate the hassle of fiddling with complex setups. I find it reassuring to know that I can quickly load my film and start scanning without any complications.
Furthermore, the versatility of this scanner cannot be overstated. It caters to a wide range of film formats, which is particularly beneficial for those of us who might have a collection of different types of films sitting around. Whether it’s my childhood photos captured on 35mm film or family gatherings immortalized on Super 8, the Kodak SCANZA allows me to breathe new life into these memories. This feature alone makes it an invaluable addition to my home technology arsenal.
In addition to its practical features, the Kodak SCANZA is designed with the user in mind. I appreciate the thoughtful design and ergonomic layout, which makes scanning a more enjoyable experience. The straightforward interface means that even those who may not be tech-savvy can easily navigate through the scanning process. I can envision my friends and family being able to use this scanner without feeling overwhelmed, allowing everyone to participate in preserving our shared history.
Not only does the Kodak SCANZA save me the trouble of needing to send my film off to a lab for conversion, but it also offers me the satisfaction of doing it myself. This means I can take my time, adjust settings as needed, and enjoy the nostalgic journey as I go through my collection. The ability to instantly view and edit images also means I can share these memories with loved ones in real-time, adding an extra layer of joy to the experience.
the Kodak SCANZA Digital Film & Slide Scanner is a powerful device that blends technology with nostalgia, making it an ideal choice for anyone looking to convert their film collections into digital formats. Its ease of use, versatility, and immediate viewing options make it a standout product in the market. If you’re like me and have a treasure trove of memories locked away in old film formats, I highly recommend considering the Kodak SCANZA. It is not just a scanner; it’s a gateway to reliving precious moments and sharing them with future generations.
Feature Description Film Formats Supported 35mm, 126, 110, Super 8, and 8mm Display 3.5″ LCD for previewing and editing Ease of Use Easy-load inserts and adapters for hassle-free scanning Immediate Viewing Preview images before finalizing scans User-Friendly Interface Designed for users of all skill levels
Get It From Amazon Now: Check Price on Amazon & FREE Returns
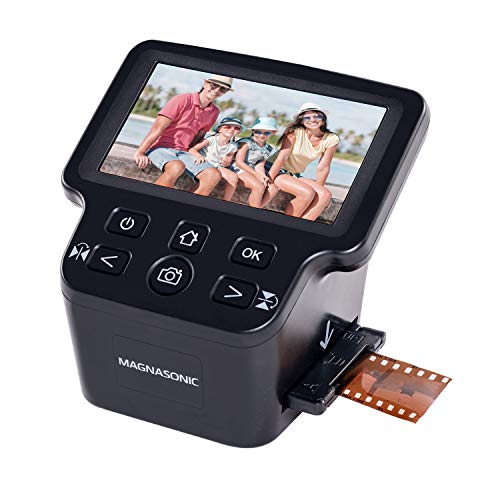
4. Magnasonic All-in-One 24MP Film Scanner with Large 5″ Display & HDMI, Converts 35mm/126/110/Super 8 Film & 135/126/110 Slides into Digital Photos, Built-in Memory (FS71)
As I delve into the Magnasonic All-in-One 24MP Film Scanner, I can’t help but feel a wave of nostalgia wash over me. This remarkable device is not just a scanner; it’s a time machine that allows me to preserve cherished memories captured on film and slides. With its ability to convert various formats like 35mm, 126, 110, and even Super 8 film into high-resolution 24MP digital JPEG files, I find it truly invaluable for anyone looking to safeguard their photographic history. It’s a perfect blend of technology and sentiment, making it an essential tool for families and photography enthusiasts alike.
One of the standout features of this scanner is its large 5″ LCD display. This screen not only allows me to preview the films and slides as I scan, but it also provides an intuitive interface for easy navigation. I can effortlessly check the quality of my scans in real-time, which significantly enhances my scanning experience. Moreover, if I want to share these memories with family and friends, I can simply connect the scanner to my TV or monitor using an HDMI cable (note the cable isn’t included), making it easy to display my digitized photos in a larger format. This feature is perfect for family gatherings where reminiscing about old times can spark joy and connection.
Another aspect that I genuinely appreciate is the built-in memory, which comes with 128MB of internal storage, alongside an SD card slot that supports up to 128GB of expandable memory. This means I can scan countless images without the constant worry of running out of space. I find it incredibly convenient to have a robust storage solution, especially when I’m working on large batches of old photos. It’s like having an entire library of my memories, right at my fingertips.
What really sets the Magnasonic FS71 apart, in my opinion, is its user-friendly operation. There’s no need for a computer or complicated software installations. For someone who may not be tech-savvy, like me, this feature is a game changer. I can adjust brightness, RGB color correction, and even flip or mirror images directly on the scanner. This level of control means I can ensure that the digitized versions of my photographs look just as vibrant and true to life as the originals.
Fast and efficient scanning is another hallmark of this product. With the included fast-loading film trays, I can scan each photo in less than five seconds. This not only saves me time but also makes the entire process enjoyable rather than tedious. I can quickly digitize stacks of old slides or negatives in a matter of hours, rather than days. The frustration-free setup means I can dive straight into the scanning process without wasting time on complicated instructions.
I wholeheartedly recommend the Magnasonic All-in-One 24MP Film Scanner for anyone looking to convert their old film and slides into digital formats. Whether you are a passionate photographer, a family historian, or simply someone who wants to preserve memories for future generations, this scanner is an excellent investment. It provides a seamless and enjoyable experience, and the quality of the scanned images speaks for itself. Don’t let your memories fade away; take the plunge and bring your cherished moments into the digital age!
Feature Description Resolution Converts to high-resolution 24MP digital JPEG files Display Large 5″ LCD screen for easy viewing and navigation Memory 128MB internal memory & SD card slot for up to 128GB Computer Requirement No computer needed; user-friendly interface directly on the scanner Scanning Speed Less than 5 seconds per scan with fast-loading film trays
Get It From Amazon Now: Check Price on Amazon & FREE Returns
Why Converting 35mm Slides to Digital Has Helped Me
As someone who has always cherished memories captured on 35mm slides, I found that converting them to digital format has been a game changer for me. First and foremost, it has made my collection far more accessible. I used to have to set up a projector and screen every time I wanted to relive those moments. Now, with my slides digitized, I can simply pull them up on my computer or tablet whenever I want, making it easy to share with family and friends.
Additionally, the quality of my memories has improved significantly. The colors and details of the original slides sometimes faded over the years, but the digital conversion process has allowed me to enhance and restore these images. This means I can enjoy them in their full glory, preserving not just the visual aspect but also the emotional impact they hold for me.
Finally, having my slides in a digital format provides a sense of security. Physical slides can be easily damaged or lost, but digital files can be backed up and stored in multiple locations. This gives me peace of mind, knowing that my cherished memories are safe and can be enjoyed for generations to come. Overall, converting my 35mm slides to digital has transformed
Buying Guide: Converting 35mm Slides to Digital
Understanding the Need for Digitization
When I first decided to convert my 35mm slides to digital, I realized how important it was to preserve my memories. These slides held cherished moments from my family’s history, and I wanted to ensure they wouldn’t fade away with time. The digital format allows for easier sharing, storage, and even editing.
Choosing the Right Method for Conversion
I found that there are several methods to convert slides to digital. I could either use a dedicated slide scanner, take advantage of professional services, or try a DIY approach with a flatbed scanner. Each method has its pros and cons depending on my budget, time, and desired quality.
Evaluating Slide Scanners
If I opted for a slide scanner, I had to consider the resolution and scanning speed. Higher resolution meant better quality images, which was important for me since I wanted to capture every detail. I also looked for features like dust removal and color correction, which would enhance my slides during the conversion process.
Considering Professional Services
Using professional services was another option I explored. This route offered convenience, especially if I had a large number of slides. I needed to ensure that the service I chose had good reviews and a solid reputation. I also checked how they handled the slides to avoid any damage.
Assessing Flatbed Scanners
Using a flatbed scanner was appealing because it allowed me to scan not just slides but also other types of documents. I looked for models that offered transparency adapters specifically for 35mm slides. The scanning software that came with the scanner was also a key factor, as I wanted user-friendly options.
Preparing Slides for Digitization
Before starting the conversion process, I took time to clean my slides. I used a soft brush and a microfiber cloth to remove dust and fingerprints. Proper preparation ensured that my scans would be as clear and vibrant as possible.
Understanding File Formats and Storage
I needed to decide on the file format for my digital images. JPEG was a common choice for sharing, but I also considered TIFF for higher quality and editing flexibility. Additionally, I planned for adequate storage, using external hard drives and cloud services to keep my memories safe.
Post-Conversion Editing and Organization
Once I completed the digitization, I took time to organize my digital files. I created folders by year and occasion, making it easy to find specific memories. Editing software was also helpful for enhancing colors and correcting any issues in my digital images.
Backing Up My Digital Memories
Finally, I learned the importance of backing up my digital files. I set up a regular schedule to copy my files to multiple locations, ensuring that my precious memories would be safe from accidental loss or damage.
By following this guide, I felt confident in my ability to convert my 35mm slides to digital and preserve my family’s history for years to come.
Author Profile

-
Hi, I’m Lauren Beard, founder of Tynt Beauty. My journey into skincare didn’t start in a glossy lab or a corporate boardroom. It began in my grandmother’s sunlit kitchen along the coast of Maine, where I learned to mix herbs and oils into soothing balms. Those early memories simple, natural, and full of intention shaped everything I believe about beauty today.
In 2025, I began documenting more of what I’ve learned. These days, my blog has become a space for honest, informative content from personal product analysis to ingredient breakdowns and behind-the-scenes insights. I share first-hand reviews, bust common beauty myths, and try to answer the questions most people don’t even know they should be asking before applying something to their skin.
Latest entries
- November 25, 2025Personal RecommendationsHow ‘0 Days Since Last Accident’ Became My Wake-Up Call: A Personal Journey to Safer Practices
- November 25, 2025Personal RecommendationsWhy I Switched to a 0 Gauge to 4 Gauge Adapter: My Expert Experience and Tips for Maximum Performance
- November 25, 2025Personal RecommendationsWhy I Trust 0 Gauge Wire Distribution Blocks: My Personal Experience and Expert Insights
- November 25, 2025Personal RecommendationsTransforming My Ride: My Expert Experience with 2002 Chevy Silverado Seat Covers